Netter's Crafty Ideas

"So you see, imagination needs moodling - long, inefficient, happy idling, dawdling and puttering." --Brenda Ueland

Tuesday, September 19, 2006

Directions for a diaper wreath.

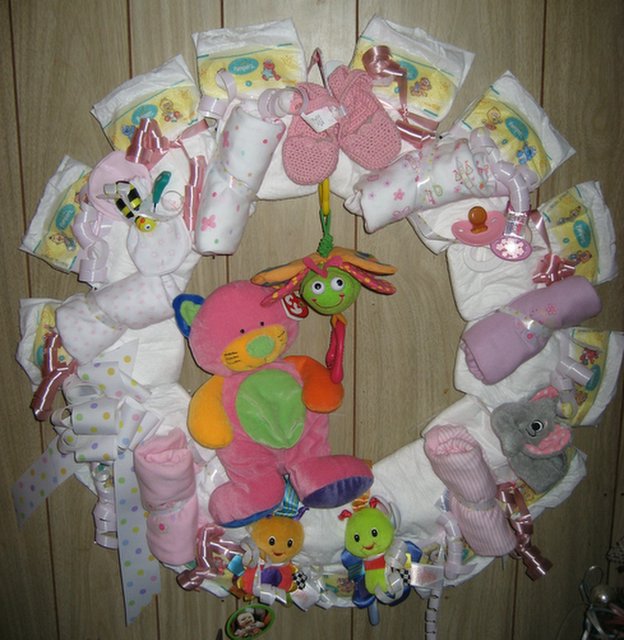
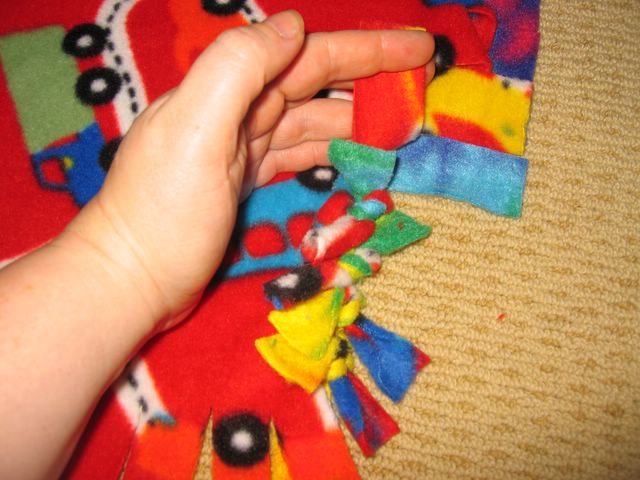
It's really not very complicated to make a diaper wreath. You take a wreath form that you purchase at your local craft store. I used a wire half form because it was super cheap and not as bulky as a full foam wreath. First I took size 1 diapers and starting from the inside of the wreath, placed the diaper around the wreath form. Just pretend the diaper is a bun and the wreath is a hotdog. Take a section of curling ribbon and wrap it around the open ends of the diaper on the outside of the wreath, knotting the ribbon. You don't have to tie it very tight to have it keep the diapers on. Take your scissors and curl the ends of the ribbon. See the example in the upper right corner. Do the same until the diapers cover the entire wreath. Some people like the diapers to fit in a tighter loop, I personally like it when they are seperated a bit on the outside, like the petals of a daisy. See the left hand photos. Then you take the items you want to place on the wreath by wrapping ribbon around the entire wreath in the sections were the diapers meet and attaching the item with a snug knot. I tucked some of the ends behind the wreath so it wasn't overpowered with curly ends on the front. In the top right hand picture, I didn't tuck the knotted end behind. You can always slide the knot behind later if you don't like the look. Keep attaching items until the wreath is full. Attach a small baby safe, washable plush toy in the center and if you wish, attach it with a giant bow to finish off the wreath. Because I used a wire wreath form, I didn't need to make a ribbon hanging loop. All I have to do to hang it is seperate the top diaper enough to use the top wire as a hanging support.

It's sooooo easy. No glue is used and later the expactant Mom or Dad can just cut the ribbon to use the things on the wreath. I hope the directions are clear enough. If you have any questions, email me: asknetter1970@aol.com Posted by Picasa

Monday, September 18, 2006

My diaper wreath

So, I started putting together all the stuff that I bought the other day for the wreath for Tishas Baby shower. The Kitty is going to be replaced with an elephant or something simular...but for now, the kitty is the stand in. Everything on the wreath is usable and I can add things or move stuff around at will. My favorite thing is the elephant Boo-boo ice cube. I'd been looking for a boo0boo bunny but when I came across the elephant, I knew I had to get it. Tisha collects elephants. Anyway, now I have to find a box to ship it home in which isn't such a small job. I have to see if I have anything else that I would like to add to it first anyway. Posted by Picasa

Monday, August 28, 2006

Photo of the week Clipboards


One of my blogger friends put me up to making these clipboards. I think they turned out really well but my Mom can't stand them. I knew that she would hate them when I was working on them. Too much clutter for her taste...but to each their own. They are really easy and you can watch TV while you create them.

Photo pillows


For my friends birthdays, I made them each a photo pillow with their kid(s) on it. I made a frame ouf of ribbon and buttons and sewed them on a pillow. I might just have to make one or two for myself.

Sunday, July 09, 2006

I still remember how to crochet!


I had to go to a craft store to pick up something for a project I am making for Tami's birthday and while I was there I felt inspired. I look at all the pretty crochet work on everyone's site and I feel so left out. It had been years since I tried to crochet. I was never very good at it and I have no idea how to read the instructions. Looks like Greek to me. Anyway, I bought a a ball of the Sugar n' spice cotton by Lily. then I went home and dug out an F5 hook and decided I could make a simple dish cloth. I am happy to announce that my sides were the straightest they have ever been and I think my tension was pretty good too...not to tight not to loose, very even. So, that is the extent of my crocheting ability. It only took me two movies to get through with it, but I was taking snack breaks, bathroom breaks, blogging breaks...basically any break I could think of. It's hard for me to relax when I crochet. Maybe that would change if I did it more often. Anyway, I think I am going to see if my Mom wants this dish cloth, since she taught me how to crochet. If she isn't interested....I'll pass it on to someone that wants it.

Thursday, March 23, 2006

Pint size aprons


OK, if you want to make some fun children sized aprons for playing dress up of for when the little ones help you in the kitchen, here is what you will need to buy to make two aprons and not have leftovers:


2 hot pads, standard hot pads without pockets
1 matching kitchen towel
a spool of a nice heavy weight ribbon
4 buttons and some matching thread


When you are done, your project should look something like this. It makes enough for two aprons. They are machine washable, that is a huge plus.

Cut the towel in half so you have two equal parts to make the skirt of the apron. Sew it onto the back of the hot pad so it hangs evenly. Cut a piece of ribbon that is long enough to tie around the child, centering it on the hot pad, over the stitched line of the skirt. Sew the ribbon on the hot pad. I made a long rectangle stitch so it is securely attached. Cut another piece of ribbon for the neck strap. Sew one side to the back of the hot pad. place two buttons on the other side of the strap so it is adjustable. On the other side of the hot pad place a button hole for the buttons to fit through so they are secure. Tada, its done. You could also make the neck strap so that it ties if you don't know how to make a button hole.

Wednesday, February 22, 2006

My latest beading projects.

 I was sitting around the other day and decided it was time to get the old beads out again. I wanted to make a set of earrings and a matching bracelet to go with my blue sweater...so I did. The beads are a little bigger than I usually go for but for some reason I really liked the mock moonstone beads and I just went with the flow. Posted by Picasa

Saturday, December 03, 2005

Snowman in a Jar

I did a little canning this winter. Yep, its a canned Snowman for those days in July when you are in the mood for a little Frosty. He even has little sticks on the sides for his little arms. I used an extra large pickle jar like you would get from a school or a business. I used extra polly fill batting from a different project and wrapped a scarf I made from left over polar fleece. I stuffed it in the jar. I then made coal pieces and a carrot nose with FIMO dough. After the eyes, buttons, mouth pieces and nose were baked and cooled, I used a pencil to help slide them into the jar in proper position. When its done, you put the lid on and make a jar cover with fabric and ribbon or you can make a label for the top. Then you will have your snowman forever. Posted by Picasa

Christmas Wreath

I made a Christmas wreath. It has little red berries and little white snowballs on it. I also have a little sled on the bottom left hand side with snow on the runners but you can't really see it in the picture. Posted by Picasa

Sunday, October 09, 2005


The Tie blanket that I taught Sherry how to make for her nephew. I think she has it down now and she is planning on making one on her own.  Posted by Picasa

Saturday, October 01, 2005

No sew polar fleece blankets...its all in the tie.


How to make a comfy polar fleece tie blanket for a toddler. You need two different pieces of ploar fleece. I use 1 1/2 yards each of fabric that compliments each other. I lay then on top of each other and trim them so they are the same size. From this point on...whenever you have to do any cutting you will be cutting though both layers of fabric at the same time. The result should be matching fringe. They are very easy to make and kids love them...if you can keep them away from the adults. Posted by Picasa


Just so you have a rough idea of what you will be doing when you cut the fleece. Posted by Picasa


Lay the two pieces of polar fleece on top of each other on the floor or a large table where you have plenty of room to work your way around the blanket with out disturbing it. Cut off any excess blanket so that you have two of the same size matching up as close as possible. I flipped back the top piece so you can see the contrasting pieces better. Posted by Picasa


A close up of one corner of the blanket. Notice that for each cut on the bottom blanket there is a matching cut on the top blanket. In the next step you will tie it off. Posted by Picasa


Now take the matching top and bottom fringe and tie them together in a knot. Complete the blanket by knotting the fringe all the way around the blanket. Posted by Picasa

Friday, September 16, 2005

Oh Crap!

I put my 2005 Christmas ornaments on here for our big exchange and Michelle saw them...dang it! I just wasn't thinking about it. So, now I had to save them as a draft and I will republish them after Chistmas. It's OK though...I'm working on another set of ornaments to give to you guys.

Wednesday, August 17, 2005


It's a long Banner...but its about done. A special thanks to Sam and Emily for their help coloring in the letters. Below are close ups. Posted by Picasa


 Posted by Picasa

Tuesday, August 16, 2005


Close up of some of our handy work. We try to make each letter or number as different as possible. We just need to add some clear glitter to make them POP. Shold be nice. Posted by Picasa


The letters are so big that it is really hard to see the whole thing when its streched out on the floor. You get the idea. I 'll post a close up of a couple of letters...or numbers. Sam helped me color them in. Now its on to the banner. Posted by Picasa

Monday, August 15, 2005

Do you know your A,B,C's


Ok...I make banners...lots and lots of banners. Birthday banners, welcome home banners, anniversary banners....you name it. This time I have to make oak tag letters for people to hold up at a surprise 60th wedding anniversary party. These are the letters before they are colored. I'm making Sam color them with markers because I also have to do a strip banner that says: Happy 60th Wedding Anniversary Blanche and Mark. I'll take a picture of it after it is colored too. I'm the letter person. It really takes me no time at all to whip these puppies up. Posted by Picasa

Thursday, June 16, 2005


I made this a long time ago...but I just found a slightly out of focus picture, so why not post it. You only live once. The bow matches the bunnies dress and it actually looked like a butt-bow....lol. You hot-glue plastic eggs on a styrofoam wreath and then you stuff easter grass around the eggs. It looked cute on the door. I ended up giving it away when I moved. Posted by Hello

Wednesday, June 15, 2005

Directions for the Flower chairs...as per Cindy's request/


Find an old wooden chair. The white chair was a very sturdy preschool chair that I picked up on trash day. I was driving buy and saw it sitting there so I grabbed it. You could also buy an inexpensive chair at a yard sale. Once you have the desired chair, drill drainage holes in the seat of the chair. I used different size bits but you can use all the same size, it doesn't matter. Don't worry about drilling to many. You don't want the plants to get root rot from sitting in to much water. Posted by Hello


Wrap a wire grid around the chair and attach to the bottom of the chair. I used screws but if you want you can use a staple gun. We were out of staples so I improvised. I cut down the sides of the wire once I have it in place. You want there to be enough dirt for a good root growth, but not too much that it looks strange or bulky. Posted by Hello


After you attach the wire grid you have place moss around the inside of the wire, around the seat of the chair. It is not shown in this picture but you have to attach the wire grid in the back also. Other wise you will have a mess and the dirt will fall out when you water it. So vasically it will be completely surrounded by wire and moss. Once that is done. Place a layer of newspaper on the bottom and sides of the chair seat. It will help hold in the dirt and help retain moisture. Then you add some potting soil and an assortment of flowers. Use something that blooms alot and depending on where you place the chair, shade or sun....make sure you have the same plant preferences. A shade loving plant will croak in the sun, ect. Posted by Hello


The end product on a big chair. The plants will grow over the edge if you buy the right kind...just ask a nursery specialist if you are not sure what to pick. I use rocks to fill in the empty dirt spaces around the chair. It gives it a rustic look. For this chair I later added a Morning Glory plant that I am wrapping around the back of the chair as its vines grow. Posted by Hello

Tuesday, May 24, 2005


I have been taking close up pictures of flowers. I loved some of them so much that I had to frame them. You can't see the detail in this picture, but its just to give you an idea of what it will look like when I hang it on the wall. If there is one you would like to see close up...let me know and I will post the original picture if I can find it on the computer. I'm not usuing that vase either, its just for an example.  Posted by Hello


My flower chair is really starting to take off. The blooms are finally filling out the seat and spilling over the edges. This is the small childs chair that I picked up...hey, you can't beat free. People really seem to like it. Posted by Hello